
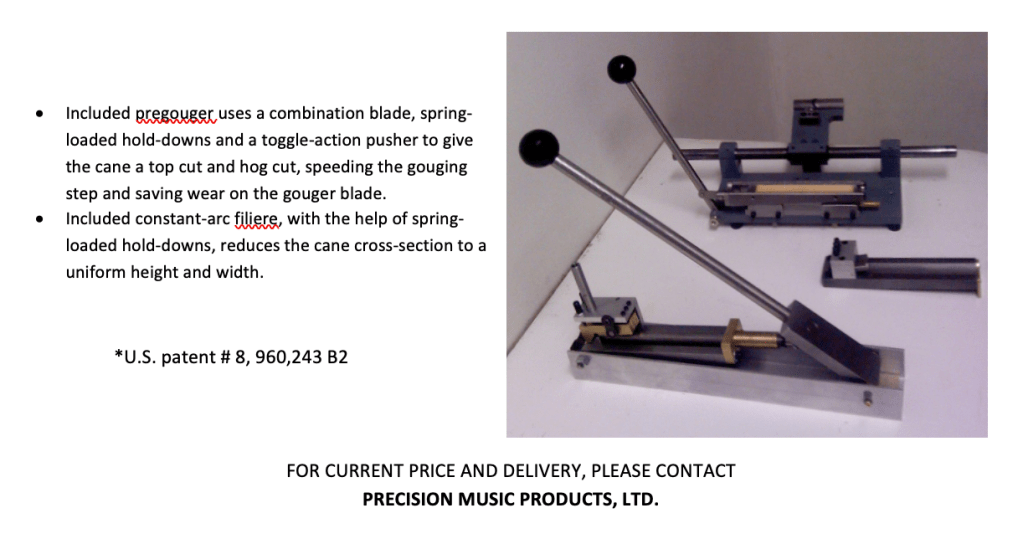
⬆ From top to bottom: Gouger, constant-arc filiere, pre-gouger ⬆
Greg James is a Canadian machinist who devised a gouger that holds cane from the edges (lengthwise) rather than from the ends, keeping the cane more flush to the bed of the gouger thus creating a more consistent gouge. Before using the gouger, the cane must be run through two pre-gougers: a heavy duty pre-gouger which trims the cane down in multiple ways, and a smaller “constant-arc filiere” which creates flat edges on either side of the cane that the gouger clamp down on, holding even warped pieces of cane flush on the gouger.
I’m writing this post because there are a things I wish I had realized earlier in the process of learning to use this system.
The first step is cutting tubes. I recommend tube cane with a diameter of at least 25mm. If you use smaller tubes than that, some of the split pieces will be too narrow to fit on this gouger. The most important thing about cutting the tubes is that you do so in such a way that the most warped part of the cane is chopped off (by the way, you need a separate guillotine; the set doesn’t include one). Then we move to pre-gouging, using the two machines described earlier.
After this step, before gouging, I do a test I call a “stress-test”. The cane has gone through enough stress at this point that structurally weak cane may crack. So to avoid gouging cracked pieces of cane, I do a test where I gently bend the cane. I have one end of the cane facing me, bark facing up, my left thumb and index finger gripping the left side of the cane and my right thumb/index gripping the right side of the cane. Then I gently bend the cane back- I am not *trying* to crack the cane, I simply apply the slightest pressure to see if a crack already inherent in the cane will emerge. I do this at both ends of the cane. The main reason I do this test is to avoid more gouging than I have to do, as gouging large amounts of cane can be arduous. You may be surprised how many pieces are already cracked. EDIT: I have had way less cracked pieces with the cane I use now- perhaps the cane I had been using was more brittle?
After this, the cane is ready to be gouged.
At first I was blasé about maintaining the quality of the blade. I don’t know much about sharpening blades, but it seems like the leading edge of the blade the machine came with wore down pretty quickly. By my 3rd batch, the gouger wasn’t taking nearly enough cane off. The same thing happened when I recently installed a new blade. I moved the blade down in its carrier slightly on both occasions (a quarter of a turn of the adjusting screw) which fixed the issue.
Assuming the gouger is now taking .07mm shavings off of the cane (as recommended in the manual), it is possible to sort much of the cane out by looking at these shavings. If it looks grainy, rough, or like you can see through it in places, these are all signs the cane is of bad quality. You can throw cane that shaves like this away immediately. I mark pieces that are *almost* good enough with a “?”, and I later confirm with my hardness tester that the “?” pile tends to be softer cane, sometimes too soft for my use.
As the blade continues to wear down after gouging a lot of cane, it will be harder for the blade to cut into the cane. For very soft pieces of cane, the blade may start to not take much off at all. You can discard this cane, but there is a break-even point where it’s no longer the softness of the cane so much as the weakness of the blade to blame for thin shavings.
After the cane dries, I do another round of the stress-test, which usually results in ~1/20 of the pieces breaking. Then the remaining pieces are ready to be soaked again, shaped and profiled. One thing on profiling- I ordered my gouger set up to make each piece .055 inch, which is significantly thicker than my old gouger. When I put these pieces on the profiler, the profiler took too much cane off. It took me embarrassingly long to figure out that I had to adjust my profiler to take off less cane, because the cane sits higher in the bed now that the gouge is .055 inch. Same goes for if you adjust the gouge thickness yourself. It’s worth checking the gouge thickness and profile thickness once per session to ensure consistency and avoid confusion.
Feel free to leave comments, questions, or tips on how to better use this gouging system!
Edit 1
The 2 “adjusting wedges” can get stuck, in different ways. The adjusting wedge that changes the thickness of the gouge was stuck the first time I went to adjust it. For that wedge, you can put your finger under the extending rod and pull up.
For the other wedge (the one that centers the gouger bed under the blade) I currently have an issue where I need to move the wedge “upstream” 2mm but there is only 1mm available to move it before it gets stuck. Greg James thinks perhaps my new blade (that I installed a couple months ago) got knocked off its carrier slightly.
Edit 2
User Manual


Hello,
Am I missing something? Can’t find any images of the gouger.
LikeLike
I’ll take some pictures soon and post them here
LikeLike